Purpose And Scope

Defining our goals and our boundaries

When buying meat in the store, customers tend to buy too much meat, and often they neglect to buy meat with a shorter expiration date. This leads to meat being thrown away and going to waste both at home and in the store, since stores are not allowed to sell meat that has passed its date of expiration. The goals of this system are therefore to help users reduce the amount of meat going to waste by offering an interactive shopping experience that makes it easier to buy the right amount of meat, as well as helping sell meat that is closing in on its expiration date.
The interactive experience consists of a smart shelf system, that uses information about expiration dates in combination with weight calculations in order to optimize the user’s choice. This system will consist of reusable tags on the products themselves. The shelf has to be aware of the products it contains, and be able to talk to the products using a small server and a sensing unit. Through an interface, the user should be able to give simple information to the shelf, such as how many persons and days the user is buying meat for, and the shelf should respond to this information, using the information contained in the tags.
To make the experience better for returning users, there will be a system to store the user’s usual needs on a user-card that will wirelessly and simply transfer this information to the shelf. The user-card will be configured using an in-store computer. The tags will be reusable, and configurable. The configuration will be done by the store using a regular computer coupled with a RFID interface.

Information

AMI and Actors

Actors

Store employees: The employees have admin rights to the system display, and interact directly with the RFID tags that are inserted on the food packaging.
Store customers: The customers are interested in saving money and the environment.

Glossary

System: The tags placed on the products that communicate with the sensing unit, combined with the server and interface for interaction.
Tag: Reusable RFID tag, coupled with a multicoloured led, that will be placed on products.
Interface: The display the users use to interact with the system.
User-card: A chip unit for storing personal preference data for users. Can wirelessly communicate this data to the shelf.
Server: A small computing unit placed on the shelf. This unit is tasked with completing the logic required by the system as well as controlling the lights of the tags.
Customer: The user of the system that interacts with the interface to find optimal products.
Sensing unit: The component of the system that will be responsible for detecting RFID tags in close proximity.
Store: Your regular, everyday supermarket.

AMI

The main elements of an AMI system, and how they are realised in this project

Sensing

The sensing part of AMI is realised by allowing the system to sense signals from product tags and user cards.

Reasoning

Algorithms that finds the best solution based on the user input on the interface and the available packages.

Acting

Our system is acting on the environment by lighting up the tags to show the user the proposed solution.

Interacting

The customers interact with the interface to make decisions and receive feedback from the interface and tags.

AmI feature Description

Sensitive: Able to “sense” the user’s meat need based on interface or/and user card.
Responsive: Shows the users to the right choices of meat in an easy and effective way.
Adaptive: The algorithm adapts to the products that currently exist in the shelf and the history on the user card.
Transparent: You will see the interface screen and tags so the system will not be transparent.
Ubiquitous: The product will be mobile and require wireless communication.
Intelligent: The algorithm manages the data of the available packages and user input to make the best decision for the customer and environment.

System Requirements

Functional Requirements

1: Position Tracking and LED interaction

F1:1 Obtaining relevant information

The sensing unit obtains information from the RFID tags, and sends this information to the server for processing. Priority 1

F1:2 Set packages about to expire

The server should, through the sensing unit, use information from the tags with close expiration date, and send a signal back to the tags to mark these with a glowing LED. Priority 1

F1:3 Light LEDs for best choice packages

When the customer is interacting with the system and has made a choice based on his parameters, the server should send a signal to the tags to light (in a different color) the tag LEDs that correspond to the customer's choice Priority 1

F1:4 Removing chosen packages

When a customer has chosen a package and removed it from the vicinity of the sensing unit, the tag LED should be switched off to avoid unnecessary annoyance. Priority 4

2: Interface and user interaction

F2:1 Home screen

The interface should have a home screen where the customer can either log in through the account card, or proceed independently of the account. Priority 1

F2:2 Setting choice parameters

The customer should be able to see and set parameters for the calculation of the optimal combination of meat products. Primary parameters in our system are a when the food is to be consumed, and how many people will consume it. The parameters are either suggested from the customer account, or specified directly in the interface without an account login. Priority 1

3: Account

F3:1 Creating an account

The admin user will be able to create a customer user account based on information provided by the customer. This information includes the amount of people the customer is usually shopping for. Priority 2

F3:2 System logging in

When the sensing unit is touched with a user account card, the relevant info is sent to the server. The system will then go to a logged in state, where the interface is updated to present the user with several options. Priority 2

4: Store personell and chip configuration

F4:1 Modifying a field

On the admin interface, there will be an option to modify the parameters of the tags (weight, price, expiration date and so on). This should allow the store employee to configure the tags in a simple fashion. Priority 1

Non-Functional Requirements

NF1 - Efficiency

The led lights should take maximum 0.5s to light up after the user has inputted the parameters.

NF2 - Usability

The system will communicate in English

NF3 - Reliability

The sensing unit and the interface must at all times be connected to a power supply

NF4 - Usability

The interface should be self-explanatory, even for customers who are not accustomed to technological solutions.

System Architecture

Hardware architecture

  • Server/Arduino: The Arduino will take in data from the RFID reader, use it to update the database, and use algorithms to compute which LEDs to light, and then send the signal to the RFID tags.
  • Database: The computer connected to the Arduino will contain a database that stores information from the RFID tags.
  • RFID reader:
    • The RFID reader is connected to the Arduino, and recieves info from the RFID tags located on each item on the shelf. The RFID reader is used both as a sensor for the RFID tags, and an actuator to the LED lights.
    • The RFID reader is also used as a sensor for the customer ID-card, to obtain customer parameters.
  • Interfaces:
    • Customer interface: An interface that the customer is faced with to optimize their choice of meat products.
    • Admin interfaces: The admin interface will consist of two functions:
      • Tag configuration: The tag configuration interface will be used to store data on the RFID tags.
      • User-card configuration: The ID card configuration interface will be used to configure a user ID card customer-specified parameters.
    To simplify the model of the system, these three interfaces will be supplied on a computer that is connected to the Arduino. In a real implementation, these interfaces could physically be realized somewhere else than near the shelf, for instance in the cashiers desk (for user-card) and behind the doors of the butcher's disk (for tag configuration)

Software architecture

Server:

  • Functions:
    • Retrieve item data through the RFID reader
    • Retrieve user data from user-card through the RFID reader
    • Retrieve user data through the user interface
    • Store item and user data in the database
    • Process data to find relevant information, e.g. items about to expire
    • Retrieve data from admin interface and store in database
    • Send appropriate actions to the RFID reader to light/turn off LEDs
  • Runs on: an Arduino connected to the RFID reader and the database via a computer
  • Interacts:
    • with the RFID reader through cabled connection
    • with database through cabled connection to a computer (or to a separate server through HTTP/REST)
    • with user and admin interface through cabled connection

Network architecture

RFID:

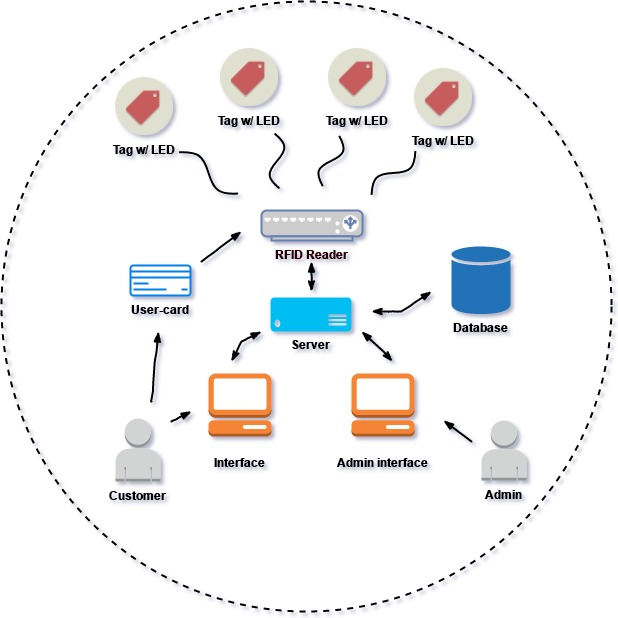
The RFID reader are connected to the tags through Radio-frequency identification (RFID). The passive tags contain information and use energy from the nearby reader's radio waves to transfer the data through the electromagnetic field.

Selected components

Hardware components:

Off-the-Shelf:
  • At LADISPE:
    • RFID passive tags
    • RFID/NFC reader
    • Arduino
    • LEDs
  • To be procured, if possible:
    • RFID Active tags
    • RFID Reader (not NFC)
    • Display compatible with Arduino

Software components:

  • Arduino libraries
  • PostgreSQL (under consideration)

Open Issues

  • How to make the shelf sense the chip in proximity, when several customers are present.
  • In order to further incentivise a decrease in the use of meat, the interface could provide an option to visualize food recipes with a small meat content, and an option to send a chosen recipe to an email either inputted by the user or stored on the personal user card.
  • Long range RFID readers are expensive and not available to us in the university laboratory, we will therefore have to find a way to use a short-range RFID (ca. 5 cm range) as a "replacement" in our demo-version.
  • Active RFID tags to activate LEDs are not available either, we will either have to find a way to connect the passive tags to LEDs in order to light them or create a more simple solution where the LEDs are connected directly to the Server/Arduino instead of to the RFID tags.

Copyright © 2014 Timber HTML Template. All Rights Reserved.